

- Build in the crate
- 5.5.21
- Made by the team at
- reFX
- Menu languages offered
- English
- How you pay for it
- k'ed by Team V.R
- macOS it plays on
- macOS 10.15 or later
- CPU it runs on
- Apple Silicon, Intel 64-bit
Screenshots
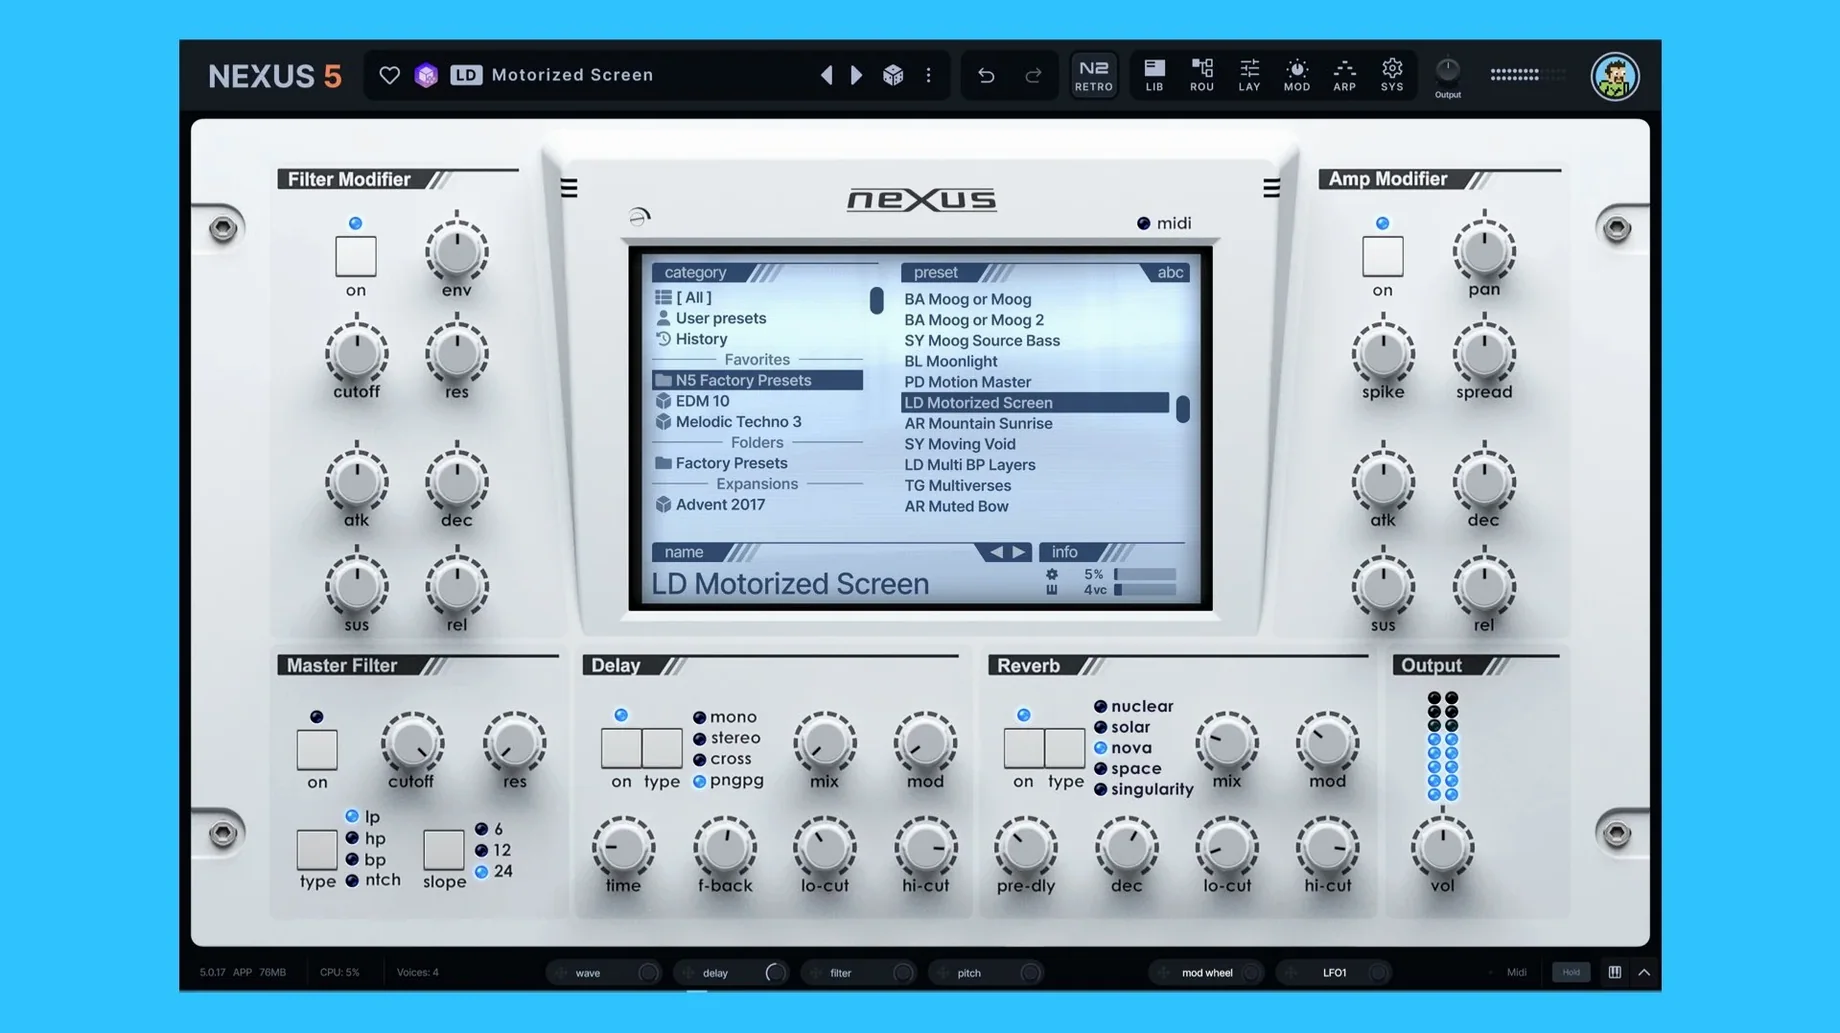
The latest update, version 5.5.12, brings a few notable additions. A new Clipper effect joins the toolkit, and the skin editor lets you tweak the interface to your liking. Modulation source tracking now shows in tooltips and depth rings, simplifying automation monitoring. A BPM override and display choice is present on the SYS page, enabling preset previews to align with your host tempo.
Nexus works as a plugin rather than a standard rompler. You can load custom samples into the instrument and combine them with virtual analog, wavetable, granular, and FM oscillators. That flexibility makes it a solid choice for sound design, not just preset browsing. You can also create custom expansions, which is handy if you build your own kits or textures.
On the compatibility front, Nexus runs on both Intel and Apple Silicon Macs, with macOS 10.15 as the minimum. It's a 64-bit plugin, and reFX Cloud handles product management, including expansions and updates. If you're on a Mac and want a plugin that does more than playback, Nexus is worth a look.
keyzone trigger for the Ducker
Some of the best features in Nexus 5.5.12 aren't the headline additions. The new keyzone trigger for the Ducker, for example, lets you duck specific frequency ranges based on which key you play. It's subtle but useful for sidechain-style effects that respond to your playing rather than an external track.
The two new oscillator wrap modes are easy to overlook too. They change how the oscillator behaves at the end of its cycle, which can add warmth or grit depending on the source material. Not something you'd tweak every session, but when you need it, it's there.
Modulation depth rings and tooltips include active source tracking, which lets you view precisely which element is modulating another without needing to search through menus. Hover over a depth ring and the tooltip tells you the source. Simple, but it saves time when you're building complex routings.
The unison overhaul with up to 16 voices is worth mentioning again in this context. It's not just more voices - the way they spread across the stereo field feels wider and cleaner. If you've been using older versions, this alone is a reason to update.
browsing presets until a pad clicks
I start a session by browsing presets to get a feel for the track. Nexus loads quickly, and I scroll through the library until something clicks. Usually it's a pad or a pluck sound that sets the mood.
Once I have a basic idea, I start layering. I load a second instance of Nexus with a bass sound, then adjust the filter and envelope to match the first patch. The modulation section lets me route velocity to filter cutoff, so the bass responds to how hard I play.
Next, I add some movement. I use the arpeggiator with the new option to use the arp pattern as the initial seq pattern. This gives me a rhythmic sequence that I can then tweak manually. I adjust the rate and gate until it locks with the track tempo.
For the final polish, I add the Clipper effect to the master channel of the plugin. It catches any stray peaks without squashing the dynamics. I also check the BPM readout on the SYS page to make sure everything is in sync with the host.
If I'm happy with the result, I save it as a custom preset. That way I can recall the exact sound and routing for future projects.
ignoring the sample import options
One common mistake is treating Nexus like a preset player and ignoring the sample import options. You can load your own samples and combine them with the built-in oscillators. That's where the plugin really shines for sound design, not just browsing.
Another is skipping the modulation section. Beginners often leave the routings at default, which means every preset sounds the same. Even simple modulation - like LFO to filter cutoff or velocity to amp envelope - can transform a sound.
Some people also forget about the skin editor. The default interface is fine, but if you work in a dim studio or prefer a different layout, you can adjust it. It's a small thing, but it makes longer sessions more comfortable.
Finally, don't ignore the unison overhaul. Beginners sometimes set unison to the maximum without adjusting the detune or spread, which results in a muddy sound. Start with fewer voices and increase the detune gradually. The new 16-voice unison is powerful, but it needs careful tweaking.
- Unison overhaul with up to 16 voices
- Added Clipper FX
- Added a skin editor
- macOS 10.15 or later
- Intel or Apple Silicon
Kit check at a glance
| System | macOS 10.15 or later |
| Chip | Apple Silicon, Intel 64-bit |
| Download | 72 MB |
| Older pressings | 36 in the crate |




Chat from the booth
Sign in or grab a free account to leave a comment.
Nobody has said a word in the booth yet. If you played a set with this build, tell the next person how it went.