

- Build in the crate
- 4.5 Build 4501
- Made by the team at
- Imagenomic
- Menu languages offered
- English
- How you pay for it
- K'ed by TNT team
- macOS it plays on
- macOS 13 or later
- CPU it runs on
- Apple Silicon, Intel 64-bit
Screenshots
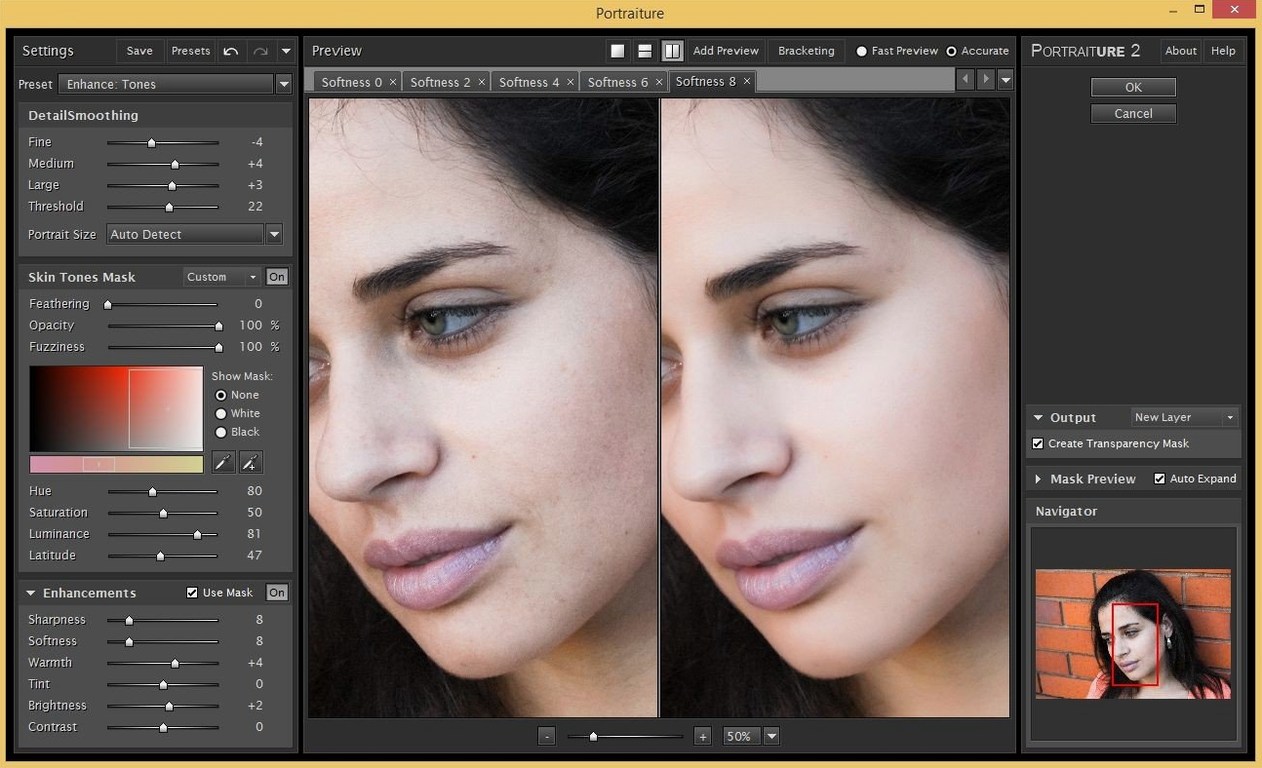
Imagenomic Portraiture for Mac works on macOS 13 Ventura and later, including macOS 15 Sequoia. It runs natively on both Intel and Apple Silicon Macs — no Rosetta workaround needed. The plugin is available in separate builds for Photoshop and Lightroom Classic, both in English only.
What does Portraiture actually do?
It’s a skin‑retouching plugin that uses an AI smoothing engine. You open it inside Photoshop or Lightroom Classic, and it detects skin tones, then lets you smooth, soften or refine pores and blemishes with sliders. Version 4.5 brings a next‑gen version of that engine.
Which Adobe apps does it support?
The current build (4501) has separate installers for Photoshop and Lightroom Classic. You choose the one you need during setup. Both plug into the host app as a filter or extension.
Bypass Gatekeeper to install
Mount the disk image, run Open Gatekeeper friendly, then press Enter in Terminal to bypass Gatekeeper. Run the installer and follow the standard procedure. Launch the app afterwards.
Built for portrait, headshot and wedding editors
Portraiture is built for anyone who edits people. If you shoot portraits, headshots, weddings or family sessions, the plugin saves you the repetitive work of masking skin by hand. Studio photographers who batch-process hundreds of images will notice the time saving most — one slider adjustment applies to every selected face, no individual layer work.
Fashion and beauty retouchers who need consistent skin across a series can set their preferred smoothing level once and keep it. For hobbyists who edit the occasional family photo, Portraiture removes the intimidation of frequency separation or dodge-and-burn techniques. It also helps if you work with Affinity Photo, since the official product page lists it as compatible alongside Photoshop and Lightroom Classic.
Users on Apple Silicon Macs benefit from the native ARM build — no translation layer, just the plugin talking directly to the processor. That matters if you run large layered files or work with high-megapixel raw images where every cycle counts.
AI smoothing that keeps nostril and hair edges sharp
The main change in Build 4501 is the next-generation AI smoothing engine. In practice, that means the skin detection is more precise around tricky edges — nostrils, eyebrows, the line where hair meets the forehead. Older versions sometimes blurred those boundaries unless you masked them manually. The new engine keeps them sharper while still softening the skin texture.
No new sliders or panels were added. The interface looks the same as 4.0. What changed is what happens under the hood when you move the Smoothing, Detail or Masking controls. The response feels more targeted to actual skin texture rather than treating all warm tones the same.
If you upgraded from an earlier version, you might notice that the default preview looks slightly different — less plastic, more natural. That is the new engine at work.
Adjust the Threshold and Smoothing defaults first
When you open Portraiture for the first time, the default preset applies a moderate amount of smoothing. Most users will want to adjust three things right away.
Threshold. This control determines which tones the plugin treats as skin. The default range is usually wide enough for lighter skin tones, but if you work with darker or mixed complexions, click the eyedropper tool and sample the actual skin area. This prevents the plugin from smoothing hair, clothing or background textures.
Detail. Beginners often leave this at zero, which gives a soft, airbrushed look. For a more natural result, bring Detail up to around 40–60. That restores pores and fine texture while still smoothing the larger blemishes.
Mask preview. Enable the mask overlay (the checkerboard or colour overlay button) before you finalise. It shows exactly which pixels are being affected. If you see the mask bleeding into eyes or lips, adjust the Threshold or use the brush to paint those areas out.
Over-smoothing at 100 makes skin waxy
The most common mistake is over-smoothing. Pushing the Smoothing slider to 100 removes all skin texture and makes faces look waxy. A value between 20 and 40 is usually enough for a clean look that still reads as real skin.
Another one is applying Portraiture to the full image without masking. Even with good threshold detection, the plugin can soften areas you want to keep sharp — hair strands, jewellery, fabric folds. Always apply it on a duplicate layer or a smart filter so you can mask out unwanted effects.
Beginners also forget to check the output resolution. If you export at a low resolution after smoothing, the softening becomes more visible. Work at full resolution, then scale down at export.
Using Portraiture on every single portrait in a set with the same preset is another trap. Different lighting, skin conditions and ages call for different amounts of smoothing. A preset that works on a well-lit young face will look wrong on an older subject under harsh studio light. Adjust per image or at least per session.
Finally, some users skip calibration. The plugin ships with generic skin profiles, but taking two seconds to sample the skin with the eyedropper makes the detection dramatically more accurate.
Workflow: retouch a single portrait from start to finish
Here is a practical workflow for retouching one headshot in Photoshop using Portraiture.
1. Open the image and duplicate the background layer. This keeps the original untouched. Select the layer and press Cmd+J. Name it "Skin Smoothing".
2. Apply Portraiture. With the duplicate layer selected, go to Filter > Imagenomic > Portraiture. The plugin window opens with a preview.
3. Sample the skin. Click the eyedropper tool in the Threshold section and click on the subject's forehead or cheek. The colour range updates to isolate the skin tones.
4. Adjust the sliders. Set Smoothing to around 25–35. Set Detail to 50. Leave Warmth and Brightness at zero unless the skin colour needs a small tweak.
5. Check the mask. Turn on the mask overlay. If the mask covers eyes, lips or nostrils, reduce the Threshold range or use the brush to paint those areas out. Click OK to apply.
6. Add a layer mask. Back in Photoshop, the filter is now on the "Skin Smoothing" layer. Cmd+click the layer mask icon to add a white mask. Paint with black on areas where you want the original sharpness — hair, eyes, glasses, edges of the face.
7.
8. Save and export. Flatten if you are done, or keep the layers for later adjustments. Export at your intended resolution.
That whole process takes about a minute once you are used to it. The first few times you might spend more time tweaking, but the plugin handles the heavy lifting of skin detection and smoothing so you can focus on the creative decisions.
- Build 4501
- Next‑generation AI smoothing engine
- macOS 13 or later
- Intel or Apple Silicon
- Photoshop or Lightroom Classic (separate downloads)
Kit check at a glance
| System | macOS 13 or later |
| Chip | Apple Silicon, Intel 64-bit |
| Download | 65 MB |
| Older pressings | 2 in the crate |








Chat from the booth
Sign in or grab a free account to leave a comment.
Nobody has said a word in the booth yet. If you played a set with this build, tell the next person how it went.